Difference between revisions of "Guides:How to Make a Jump Button"
From Castle Wiki
(Formatting changes, grammar) |
m (newline) |
||
| Line 3: | Line 3: | ||
# '''Add artwork''' Jump buttons usually need artwork in order to be visible. A traditional jump button is simply a arrow in a square facing up, but you can '''customize''' this however you want | # '''Add artwork''' Jump buttons usually need artwork in order to be visible. A traditional jump button is simply a arrow in a square facing up, but you can '''customize''' this however you want | ||
#'''Enable Relative to camera''' If you want the jump button to stay on the screen if the camera is moving at the '''bottom of general''' you will see '''relative to camera, turn that on''' | #'''Enable Relative to camera''' If you want the jump button to stay on the screen if the camera is moving at the '''bottom of general''' you will see '''relative to camera, turn that on''' | ||
#'''Add jump logic''' | #'''Add jump logic''' The code should go as follows | ||
'''When this is tapped''' | '''When this is tapped''' | ||
'''Tell actors with tag [tag]''' | '''Tell actors with tag [tag]''' | ||
Latest revision as of 09:21, 7 July 2022
A jump button is a form of custom control, here are the steps to make a jump button:
- Add artwork Jump buttons usually need artwork in order to be visible. A traditional jump button is simply a arrow in a square facing up, but you can customize this however you want
- Enable Relative to camera If you want the jump button to stay on the screen if the camera is moving at the bottom of general you will see relative to camera, turn that on
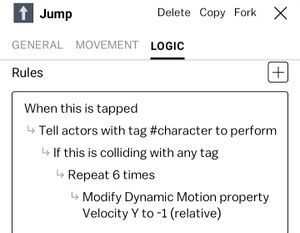
- Add jump logic The code should go as follows
When this is tapped
Tell actors with tag [tag]
If {this is colliding with} [tag]
Repeat [N] times
Modify {dynamic motion property velocity Y
to [-N] Relative to current value
