Difference between revisions of "Guides:How to make an Action Platformer"
(Initial writing) |
(try to fix gif) |
||
| (26 intermediate revisions by the same user not shown) | |||
| Line 9: | Line 9: | ||
See that? The game is playable at any time from the play button, so you can test out what you've built so far. Just press it whenever you want to try out your deck. | See that? The game is playable at any time from the play button, so you can test out what you've built so far. Just press it whenever you want to try out your deck. | ||
[[File:Block small artwork.png|thumb|215x215px]] | |||
== Designing your first tile == | == Designing your first tile == | ||
Now that you understand the basics of the editor, we can start making your game unique to you. Lets customize the ''Block Small'' blueprint by finding it in the belt on the bottom (search for the grey block named "Block Small"), and tap "edit". | Now that you understand the basics of the editor, we can start making your game unique to you. Lets customize the ''Block Small'' blueprint by finding it in the belt on the bottom (search for the grey block named "Block Small"), and tap "edit". | ||
Pressing edit opens the inspector, where you can see the contents of our little block blueprint. From here we can change all kinds of properties of the block. Try opening the art tool by tapping on the block's artwork (pictured) | |||
With the art tool open, you'll be able to modify the art in any way you want. We're going to draw a grass block instead of the default dark stone, but you can draw something that fits ''your'' games's theme. Here's the grass block we made: | |||
[[File:Grass art.png|frameless]] | |||
Whatever it is that you drew, you can now exit the art tool with the [X] button on the top left to see the scene with your new artwork. You'll see that ''all'' of the 'Block Small' actors have updated to use the new artwork. This is because they're all based on the same Block Small [[blueprint]]. There are also two 'Block Big' actors still in the scene which haven't changed at all. This is because they are using a different blueprint which' art you haven't changed yet. It's up to you if you want to select them and redraw their art as well, or if you'd prefer to just delete them by selecting them and pressing the ''trash'' icon on the top right corner. | |||
Once you've handled the Block Big actors, you should have a scene that looks a lot more customized— something like the image below.[[File:Customized action platformer scene.png|thumb]]One thing you might not have is the custom background color. You can pick your own by pressing the gear icon on the top of the editor, navigating to the layout tab and then picking a new background color from the palette. | |||
You can, and should, continue to customize your world's art as much as you'd like! You can expand to editing the player's art, hazards and obstacles, or otherwise. Whenever you're ready, we'll move on to ''building our level and creating challenges''. | |||
== Create Challenges == | |||
Now that we've customized some of the graphics, let's move on to building a fun and challenging level to play. | |||
To make your game unique, we'll need to build cool levels and interesting hazard zones that give the player something to overcome. Try adding some blocks that include parkour like jumps and put keys in difficult to reach spots. Don't be afraid to scramble the default layout and shape it into something entirely new! | |||
Here are some '''ideas for dastardly tricks''' and traps to present your players with: | |||
=== Platform Hopping === | |||
Lay out platforms with gaps in them to create hop-able platforms[[File:Platform Hopping Illustration.png|frameless|200x200px]] | |||
=== Wall Jumping === | |||
Arrange walls in parallel to make jumpable spots on each side.[[File:Wall jump animation.gif|frameless|246x246px]] | |||
== The Door == | |||
Once you're done filling out a challenging level, creating your own artwork, and maybe even adding text to build out a story, you can add your exit '''''Door''''' at the end of the game. The exit is usable only if the player has collected all of the keys throughout the game, so make sure that the keys are all accessible! | |||
== Conclusion == | |||
You've come a long way and built your first Action Platformer game on Castle! It's custom built to tell a story you wanted to tell and crafted out of your own artwork and level design. All that's left is to share it with your friends or post it publicly! Thanks for following along with this tutorial! | |||
Latest revision as of 04:52, 3 May 2022
Making an action platformer is an easy task with Castle and the template action platformer kit. The first step to making your game is figuring out what kind of game you want to build. Are you interested in theming your platformer with dragons and wizards, science fiction contraptions and robots, or your favorite characters from games and movies? You can pick any idea you can imagine. Once you have your idea, we'll progress to setting up the deck.
Starting with the Action Platformer kit
Now that you have your game idea in mind, we'll start our new deck. Navigate to the create screen of Castle, and press "New deck" on the top right corner. You'll now see a list of kits. Pick the Action Platformer kit to view it in the editor.
Once the kit is opened, you'll be able to see all of the kit's actors laid out the editor scene and view it's blueprints in the scrollable belt at the bottom. You can grab and drag any actor or blueprint about in the scene. Grabbing a blueprint from the bottom and pulling into the scene adds a new actor. Feel free to move things around in the scene and redesign the level.
Try pressing the play button on the top of your screen and see what happens.
See that? The game is playable at any time from the play button, so you can test out what you've built so far. Just press it whenever you want to try out your deck.
Designing your first tile
Now that you understand the basics of the editor, we can start making your game unique to you. Lets customize the Block Small blueprint by finding it in the belt on the bottom (search for the grey block named "Block Small"), and tap "edit".
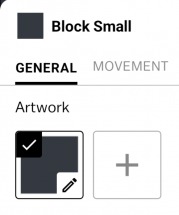
Pressing edit opens the inspector, where you can see the contents of our little block blueprint. From here we can change all kinds of properties of the block. Try opening the art tool by tapping on the block's artwork (pictured)
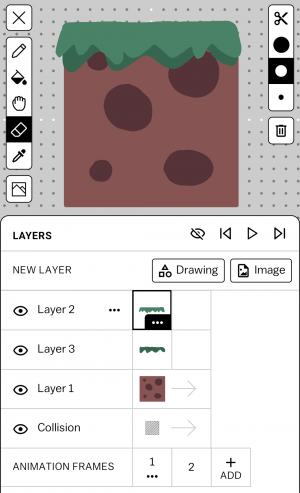
With the art tool open, you'll be able to modify the art in any way you want. We're going to draw a grass block instead of the default dark stone, but you can draw something that fits your games's theme. Here's the grass block we made:
Whatever it is that you drew, you can now exit the art tool with the [X] button on the top left to see the scene with your new artwork. You'll see that all of the 'Block Small' actors have updated to use the new artwork. This is because they're all based on the same Block Small blueprint. There are also two 'Block Big' actors still in the scene which haven't changed at all. This is because they are using a different blueprint which' art you haven't changed yet. It's up to you if you want to select them and redraw their art as well, or if you'd prefer to just delete them by selecting them and pressing the trash icon on the top right corner.
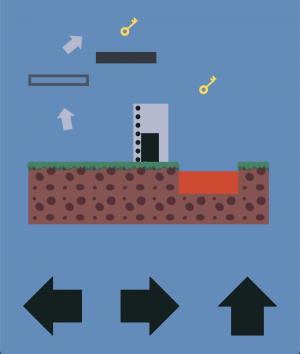
Once you've handled the Block Big actors, you should have a scene that looks a lot more customized— something like the image below.
One thing you might not have is the custom background color. You can pick your own by pressing the gear icon on the top of the editor, navigating to the layout tab and then picking a new background color from the palette.
You can, and should, continue to customize your world's art as much as you'd like! You can expand to editing the player's art, hazards and obstacles, or otherwise. Whenever you're ready, we'll move on to building our level and creating challenges.
Create Challenges
Now that we've customized some of the graphics, let's move on to building a fun and challenging level to play.
To make your game unique, we'll need to build cool levels and interesting hazard zones that give the player something to overcome. Try adding some blocks that include parkour like jumps and put keys in difficult to reach spots. Don't be afraid to scramble the default layout and shape it into something entirely new!
Here are some ideas for dastardly tricks and traps to present your players with:
Platform Hopping
Lay out platforms with gaps in them to create hop-able platforms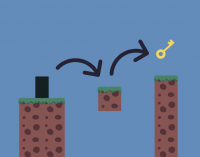
Wall Jumping
Arrange walls in parallel to make jumpable spots on each side.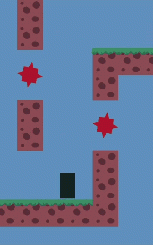
The Door
Once you're done filling out a challenging level, creating your own artwork, and maybe even adding text to build out a story, you can add your exit Door at the end of the game. The exit is usable only if the player has collected all of the keys throughout the game, so make sure that the keys are all accessible!
Conclusion
You've come a long way and built your first Action Platformer game on Castle! It's custom built to tell a story you wanted to tell and crafted out of your own artwork and level design. All that's left is to share it with your friends or post it publicly! Thanks for following along with this tutorial!
