Difference between revisions of "Guides:Castle Crash Course"
(How to share image) |
(image resize) |
||
| Line 78: | Line 78: | ||
== Publishing your intro deck == | == Publishing your intro deck == | ||
[[File:How to share.png|thumb]] | [[File:How to share.png|thumb|531x531px]] | ||
You've done it! You have a cool intro deck ready to share with the rest of the Castle world. The last step in making a deck is to publish it! You can publish your new introduction deck to your profile and the public feed by setting it to "published" from the share screen. Here's how you can navigate there: | You've done it! You have a cool intro deck ready to share with the rest of the Castle world. The last step in making a deck is to publish it! You can publish your new introduction deck to your profile and the public feed by setting it to "published" from the share screen. Here's how you can navigate there: | ||
Revision as of 09:41, 31 May 2022
This article is an outline for a future collection of guides, and is incomplete
The following is a possible rough draft outline
Introduction
Welcome to a crash course on how to build games and interactive art with Castle! In this course, you'll learn how build all sorts of blueprints, widgets and gizmos to make whatever you can imagine using the Castle editor. You'll have the know-how to build your own Castle adventure game and will have learned the ropes of how to craft even more custom creations.
Before you begin, make sure you have the Castle app installed on your device. Optionally, make a Castle account so that you can post your work as you finish it.
You can find Castle on the Google Play Store or iOS App Store. Move ahead once you have your own copy of the app!
Chapter 1 - Starting a new card
What you'll learn to build in this chapter: A cool intro page card for your Castle profile!
Castle cards are what Castle is made of. They're collections of actors and are filled with games, curiosities, stories, and characters. When you first opened up Castle, you might have played the feed, an infinite stream of games made by real people.
Whenever you want to start a new deck of your own, just navigate to the Create screen and select the "New Deck" button on the top right. This will create a deck, or a collection of cards for you to begin creating from.
From here, you'll have the option to select any of the kits featured on the New Deck menu, or you can pick "Blank" to make a deck without any preset contents. Let's make a new deck now, and let's start with a Blank canvas so that we can learn about some Castle concepts.
As soon as you tap on the Blank deck option, it will expand into an editor that fills the screen. The background is a light blue and there are white bars on the top and bottom of the screen. There are 6 buttons on the screen, so let's take a look at what all of them do.
- On the top right is the back button, which will take you back to your create screen.
- The play button in the top center will put your deck into play mode and let you try out what you've made so far. The deck is empty right now, so it will just be blank.
- Next are the Undo and Redo buttons, which just let you roll back your previous action and move around through your changes.
- The forth button, located in the top center, is the Tools gear icon. This button will open up the Tools menu to show you some extra deck options.
- The save button will save your deck so that you can come back to it later. Do this often!
- On the bottom center of the screen is the + button, which is how you add new actors into the scene.
Try taking a look at each button and experimenting with them so that you remember what they do in future.
Actors and Blueprints
Actors are the building blocks that make cards work! Think about some of your favorite games– if they include something like a player character, spaceships, coins, or collectable loot, all of those things are examples of actors! Actors can move around, be controlled by the player, explode, grow or shrink, they can do pretty much anything really.
Actors makes sense, but what are blueprints? Well, we usually don't want only one coin or one enemy. We want lots, sometimes even dozens or hundreds of the same sort of actor. It would be really exhausting if we had to redraw our characters and items every time we wanted another, which is why we have blueprints, which are designs that we can pre-make and that actors can then be created based on. Whenever we want to make a new actor, we first design a blueprint that it will be made from, and then we drag the blueprint into the card to place an actor that uses the blueprint!
Let's make a new blueprint.
- Tap on the + button
- Select "Empty Blueprint"
The blueprint is now visible at the bottom of the editor!
Now we can edit it by pressing "Edit blueprint". This will open the inspector, which is a control panel where we can edit everything about our blueprint's actors. For this section, let's design a cool intro page for your account! This blueprint can be the first part of your page, the title. Rename the blueprint to whatever you want by tapping on the title and editing it. We're naming ours "My Title".
Artwork Basics
If we want to make a nice title piece for your intro card, we definitely need to know how to add art to our blueprints. The good news is that there's an art and drawing tool built right into Castle. Just tap the empty "Artwork" frame with the pencil icon on it. This will open the art tool.
Take a look around around. There are lots of tools and options here. On the left side, we see a bar of selectable tools:
- Pencil tool: This tool lets you draw shapes and lines
- Bucket tool: Fills existing spaces with new colors
- Hand tool: This tool lets you reshape and warp drawings
- Eraser tool: Clears away drawings
- Eyedropper tool: Picks a color from the drawing canvas
When you select a drawing tool from the tools list, sometimes it has tool options that appear in a list on the right side. Initially the pencil tool is selected, and it has a set of options which you can experiment with. Pick your color from the color picker on the top right and write your name! Here are some example names we drew in different styles:
<insert title drawings picture>
While you're working on your art, you can order the different parts of your drawings and images conveniently by adding new layers. To add a new layer, press either the "drawing" or "image" button, depending on whether you want to upload and image to Castle or draw by hand.
Now that your first piece of artwork is done, let's drag the new Title blueprint into the card scene by grabbing it from the belt on the bottom and dragging upwards. As soon as you drop it into the scene, it will be created as a new actor.
Fleshing out your introduction deck
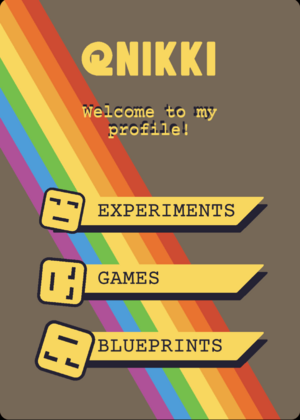
Great work so far! You've learned how to create blueprints, draw artwork, and place new actors. Now you're free to flesh out your intro deck with more art and designs! Here's what an example of an introduction deck for the profile @Nikki might look like:
As you can see, it lists a few facts about @nikki's profile, like how there are experiments and games on it!
Here are some ideas for your own introduction deck:
- Sketch or type your name in big letters.
- Draw your Original Character and feature it in the deck!
- List some things that you enjoy or want to build on castle.
- Add decorations in the background!
Publishing your intro deck
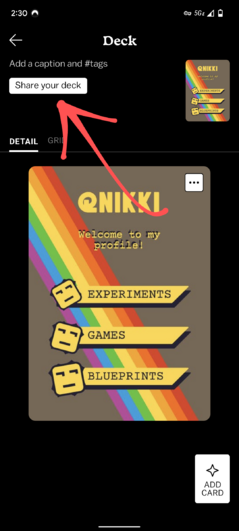
You've done it! You have a cool intro deck ready to share with the rest of the Castle world. The last step in making a deck is to publish it! You can publish your new introduction deck to your profile and the public feed by setting it to "published" from the share screen. Here's how you can navigate there:
- Navigate to the "Deck" screen by tapping on your deck from the create screen, or pressing the back button if you're already in the editor.
- Press "Share your deck"
- Write a caption if you want to, and then select the "Public" visibility option.
- Press save, and exit!
Woohoo, your deck is now public, so other castle users can see it and play it themselves. Welcome to Castle, and thanks for finishing chapter one of the Crash Course!
Chapter 2 - Movement, physics, and touchable decks
What you'll build in this chapter: A fancy Rube Goldberg Marble Machine!
Your deck is bustling with shapes and colors, but it's lacking something. There's no movement! Castle decks aren't just about still art, sometimes they're about making interactive systems that can do things that even the creators would never have expected. One fun thing to add to your decks is movement, which can make your actors come to life on the screen.
Let's try adding movement to an actor. Once you have a new actor, which you'll create with a blueprint, make sure that it doesn't move when you press play. You can add movement behaviors to it from the "Movement" tab, on the top of the inspector.
<Image of the movement tab on the top of the inspector>
Press "Add Behaviour" and choose "Drag" near the bottom of the list.
Chapter 3 - Using Rules
What you'll build in this chapter:
Using rules to craft custom events and behaviors
Chapter 4 - Labeling actors with Tags
What you'll build in this chapter:
Tags are a useful tool for helping actors to decide what to do when they interact with each other, or signaling for different events to happen.


